Video Noise Reduction: A Complete Guide to Cleaner Footage
Discover practical tips and top tools for video noise reduction to fix grainy footage and boost clarity in your projects.
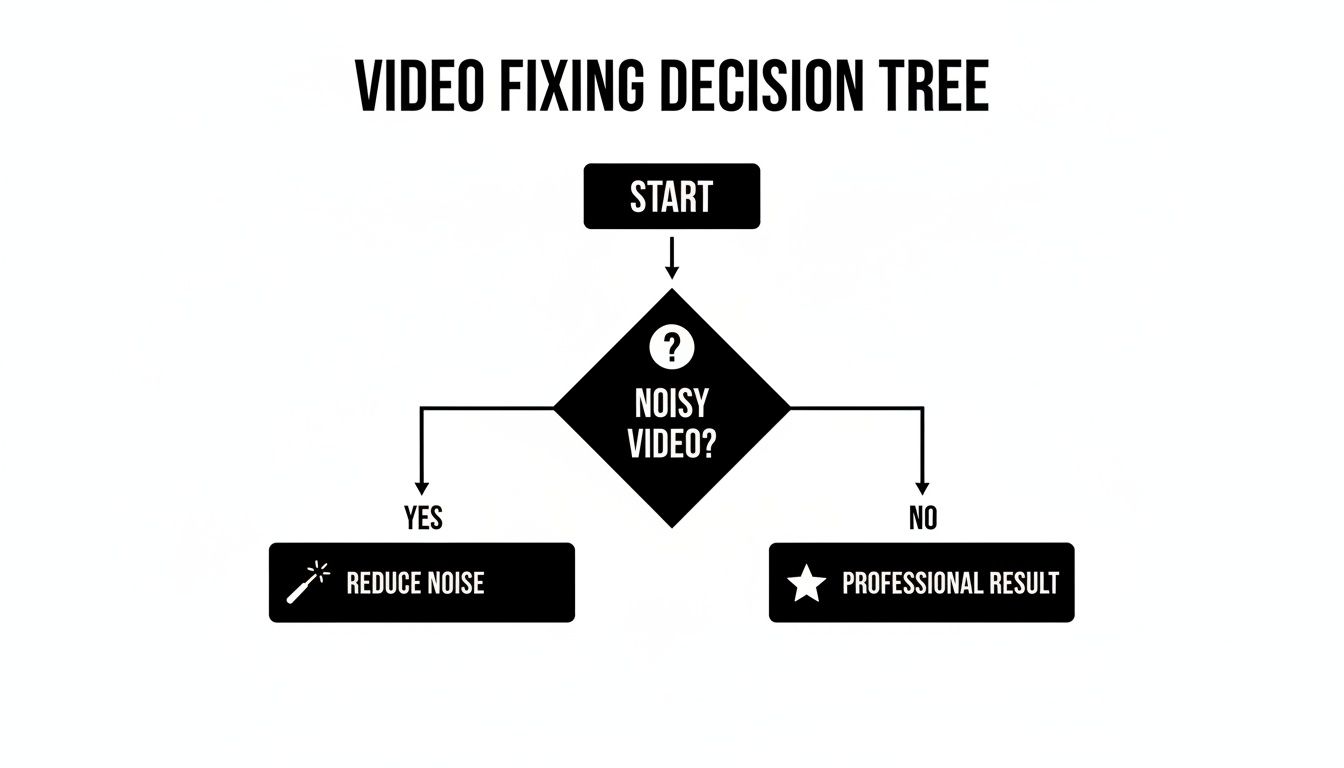
Video noise reduction is simply the process of cleaning up unwanted grain and visual static from your footage. The goal is a sharper, more professional look. It's a must-have skill for any creator, especially if you often find yourself shooting in less-than-ideal lighting.
Why Clean Footage Is a Non-Negotiable Asset
Let's be real for a moment. Grainy, noisy video cheapens your message and makes people click away. In a sea of polished content on YouTube and TikTok, visual clarity isn't just a nice-to-have; it's the price of entry.
Bad video quality does more than just look unprofessional—it actively sabotages your work. Visual noise can turn a simple color correction into a nightmare, as you fight against digital artifacts instead of enhancing your image. It also craters the perceived value of your brand. When a viewer sees fuzzy footage, they subconsciously assume the content is just as sloppy.
The Hidden Costs of Noisy Video
Beyond just looking bad, noisy video creates real technical problems that can derail your entire project. I've seen it happen time and time again:
- AI Tools Get Confused: Algorithms that need clean visuals, like background removers, really struggle with noisy clips. The grain tricks the AI, resulting in flickering edges and messy cutouts, especially around detailed areas like hair.
- Compression Gets Ugly: Codecs have a tough time efficiently compressing noisy video. When you upload that footage, the platform’s own compression can make things even worse, introducing blocky, distorted patches that weren't there before.
- Engagement Plummets: All that visual static is distracting. It forces the viewer's brain to work harder to process the image, pulling focus away from your actual subject. This cognitive load often translates directly into shorter watch times.
The bottom line is that noise competes with your subject for the viewer's attention. Every single speckle is a tiny distraction that, when added up, builds a wall between your message and your audience.
Modern Solutions for a Common Problem
Thankfully, you no longer need a Hollywood budget to fix noisy video. The tools are more powerful and accessible than ever. If you're just getting started, like when you're setting up your first stream, getting clean footage from the get-go will save you a world of hurt in post-production.
For anyone serious about upping their game, mastering noise reduction is a critical step. For a broader look at this, our guide on how to improve video quality offers more great tips.
The demand for this technology is exploding. The global market for background noise reduction software is expected to jump from USD 2.31 billion in 2025 to an incredible USD 45.02 billion by 2034. That massive 39.1% compound annual growth rate just goes to show how essential clean audio and video have become for everyone.
How To Diagnose The Noise In Your Video
Diving into a video noise reduction filter without knowing the problem is like opening your car’s hood and hoping for the best. You need to play detective, examining exactly what kind of visual static is tainting your footage before you apply any fix.
Not every speckle or square block is created equal. Grain in a late-night smartphone clip behaves differently than the chunky artifacts left by an aggressive export process. Each demands a unique method.
Identifying Digital Noise Vs Compression Artifacts
At the heart of most noisy videos are two familiar foes. Digital Noise shows up as a fine, shimmering granularity across the entire image. It’s born when a sensor fights for light in dark environments or gets pushed to a high ISO.
On the flip side, Compression Artifacts appear as blocky, smudged patches or mosaics, especially in areas of motion or smooth gradients like open skies. This mess emerges whenever a codec squeezes file sizes too hard.
You can spot them in real shoots:
- Grainy Concert Footage: A nighttime show filmed on a phone, with a uniform speckle riding every frame.
- Blocky Social Media Upload: A crisp 4K clip transformed into chunky shadows after an online platform recompresses it.
This chart underscores one simple truth: accurate diagnosis is the first move toward a polished final cut.
Looking Closer At Luminance And Chroma Noise
Sometimes digital noise splits into two camps. Luminance Noise distorts brightness, creating a black-and-white grain pattern akin to old film. It’s often more forgiving, blending with natural texture.
Chroma Noise injects random splashes of red, green, or blue pixels. Those colorful speckles stand out more and can cheapen your scene. Most advanced tools let you tweak each independently.
Pro Tip: Tame chroma noise with more force than luminance. A hint of brightness grain can add character, but rogue color spots rarely look good.
For a deeper dive into how still images handle these issues, check out understanding image noise. Photo and video sensors share the same quirks, so that background reading will pay off.
Common Types Of Video Noise And Their Causes
Below is a quick reference guide to help creators identify the type of visual noise in their footage and understand its most likely source.
| Noise Type | Appearance | Common Causes | Best Solution Approach |
|---|---|---|---|
| Digital Noise | Fine, dancing grain | High ISO settings, low-light shooting | Temporal denoising, ISO balance |
| Compression Artifacts | Blocky, smudgy patches | Aggressive codec compression | Spatial filters, softer encode |
| Banding | Visible steps in gradients | Color depth reduction | Dithering, higher bit depth |
| Posterization | Flat areas with abrupt color changes | Over-compression, low dynamic range | Smoothing algorithms, HDR merging |
Armed with this chart, you’ll quickly narrow down your troubleshooting path.
Pinpointing the exact nature of noise in your clip is the foundation of professional-looking results. Once you know whether it’s high-ISO grain, compression artifacts, or a mix of both, you can dial in the right algorithms and preserve those precious details for a crisp, clean outcome.
Choosing Your Video Noise Reduction Toolkit
Once you've diagnosed the kind of noise you're dealing with, the next step is picking the right tool for the job. Your options really boil down to two camps: the tools already built into your video editor and specialized third-party plugins you can buy and install.
The best choice hinges on what your project demands, what your budget looks like, and honestly, how much time you want to spend fiddling with settings. A YouTuber churning out a weekly vlog has a completely different set of needs than a video agency delivering a big-budget commercial.
Native Tools in Your Video Editor
Most professional video editing software—what we call a Non-Linear Editor or NLE—comes with its own noise reduction filters. Think of these as your first line of defense. For moderate noise, they can be surprisingly effective.
The biggest plus? They're already part of your workflow. No extra costs, no installation headaches.
Here’s a quick rundown of what you’ll find in the major NLEs:
- DaVinci Resolve Studio: Resolve is famous for its color grading, but its native noise reduction is arguably best-in-class. You get separate Temporal and Spatial controls, which let you dial in the effect with incredible precision, treating motion and static areas of the frame differently.
- Adobe Premiere Pro: Premiere's built-in options are more basic. They can handle a bit of light grain, but they often lack the sophisticated algorithms to tackle heavy noise without turning your image into a soft, mushy mess.
- Final Cut Pro: Apple’s NLE offers a super simple, drag-and-drop noise reduction filter. It’s fantastic for a quick fix because it's so user-friendly, but that simplicity comes at a cost—you get almost no manual control, which is a real problem when you need a nuanced result.
For a lot of people, especially if you're just starting out, these built-in tools are plenty powerful to clean up footage from a smartphone or a mirrorless camera where you pushed the ISO a little too high.
When to Upgrade to a Specialized AI Plugin
Native tools are handy, but they have a ceiling. When you’re up against seriously noisy footage or you absolutely must preserve every ounce of detail, a dedicated third-party plugin is the way to go. These tools are built by companies obsessed with image processing, and it shows in their algorithms.
Modern plugins, especially those powered by AI, analyze footage on a completely different level. Instead of just applying a blanket softening effect, they can intelligently distinguish between ugly grain and crucial details like the texture of someone's skin or the pattern on their shirt. The result is a clean image that doesn’t look fake or "plastic."
The real magic of a dedicated tool is its ability to perform surgical video noise reduction without causing collateral damage. It gets rid of the bad stuff (noise) while fiercely protecting the good stuff (detail)—a balance that generic filters rarely get right.
Picture this: you shot a powerful interview in a dimly lit room. The emotional content is gold, but the footage is swimming in chroma noise. A basic filter might reduce the colored splotches, but it will probably wipe away the subject's subtle facial expressions, too. An AI plugin, on the other hand, is smart enough to kill the noise while keeping those critical details perfectly sharp.
The Growing Demand for Dedicated Solutions
This need for high-quality processing isn't just a niche concern; it's a huge and growing market. We're seeing this trend everywhere. For example, the audio noise reduction software market is expected to jump from USD 1,423 million in 2025 to USD 1,882 million by 2032.
Even more telling is the online audio tool segment, which is projected to grow from USD 563 million in 2024 to USD 961 million by 2032. This shows a massive demand for powerful, easy-to-access cleanup tools. If you're curious, you can explore detailed market analysis on Infinity Market Research. The takeaway is clear: creators are more than willing to invest in dedicated solutions that save them time and deliver far better results, and this holds true for video noise reduction.
Making the Right Choice for Your Workflow
So, how do you decide? It's all about matching the tool to the task at hand.
| Tool Category | Best For | Pros | Cons |
|---|---|---|---|
| Native NLE Tools | Quick fixes, moderate noise, beginners, and budget-conscious creators. | No extra cost, seamless workflow integration, easy to learn. | Limited control, can soften details, may struggle with heavy noise. |
| AI Plugins | Heavy noise, professional projects, preserving maximum detail. | Superior results, intelligent noise analysis, often faster processing. | Additional cost, may require more powerful hardware. |
If you're a freelancer making content for social media, the native denoiser in DaVinci Resolve or Final Cut Pro is probably all you need. It’s fast, free, and does the job. But if you’re a small production house shooting a documentary, investing in a specialized plugin like Neat Video is a no-brainer. It’s a business decision that ensures every shot looks incredible and helps you maintain a high-quality, professional standard across the entire project.
A Practical Workflow for Reducing Video Noise
Alright, let's move from theory to action. This is where you actually start cleaning up your footage. Once you know what kind of noise you're dealing with and have a tool in mind, you need a solid, repeatable process.
I'll walk you through my go-to workflow using DaVinci Resolve Studio as our main example. Its tools are incredibly powerful, and the principles apply to most professional editing software. Think of this as your game plan for getting clean video without turning your subjects into plastic-looking mannequins.
Let's imagine a common scenario: you're editing an interview shot in a dimly lit room. The footage is grainy because the ISO was cranked up, but you absolutely have to keep those subtle facial expressions sharp. The whole trick is applying the right type of video noise reduction at the right stage of your edit.
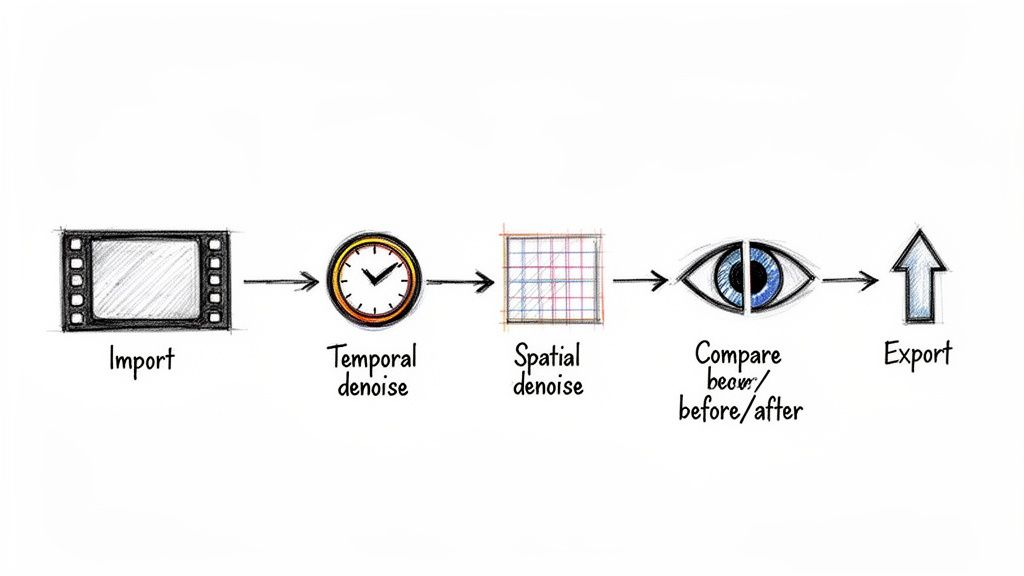
Start with Temporal Denoising
First rule: always tackle noise reduction early, preferably on the raw, ungraded clip. If you color correct first, you’ll just end up making the noise louder and harder to remove. Inside Resolve's Color page, your first stop should always be Temporal NR.
Temporal noise reduction is a brilliant piece of tech. It works by looking at pixels across several frames. It’s smart enough to identify the erratic, dancing pixels (the noise) and leave the consistent, stable pixels (your details) alone. This makes it a beast for cleaning up backgrounds or any part of the shot with little movement, all without smudging the important stuff.
Here are the settings I usually start with:
- Frames: Kick it off with 2. This tells the software to average the pixels across two frames. You can push this higher for more reduction, but be careful—it’s a performance hog and can create motion blur on anything that moves.
- Motion Estimation Type: Always set this to Better. Sure, "Faster" is an option, but Better does a far superior job telling the difference between noise and actual motion, which is exactly what we need to preserve detail.
- Luma and Chroma Thresholds: This is where the real artistry comes in. I start with them linked and slowly inch the value up until that fizzy grain in the background starts to dissolve. If you're seeing more colorful speckles than a general graininess, unlink them and get a bit more aggressive with the Chroma slider.
Your goal here is simple: kill the most obvious noise without creating weird "ghosting" trails on moving elements, like the speaker's hands. If you see that, you've gone too far. Dial it back.
Apply Spatial Denoising Sparingly
After you've done what you can with the temporal filter, it's time to bring in Spatial NR. This tool is a different animal; it works on one frame at a time, analyzing a pixel in relation to its neighbors. It's essentially a very intelligent blur. Because of that, you have to use it with a light touch, after you've already done your temporal pass.
Spatial NR is the heavy artillery, but it's not subtle. Use it to mop up what temporal denoising left behind, not as your main weapon. Overdoing it is the quickest way to get that awful, waxy, "plastic" look.
In the Spatial NR panel, I start with the Mode set to Better for a good quality-to-performance ratio.
From there, gently increase the linked Luma and Chroma thresholds. You're looking at the areas that are still noisy, which are often on the moving parts of your subject that the temporal filter was trying to protect. Subtlety is everything. Nudge the sliders just enough to knock back the remaining grain without wiping out skin texture or the weave in your subject’s shirt. Unlink them if you need to hit some stubborn color blotches specifically.
Comparing and Refining Your Results
Our eyes are tricky. They adapt so quickly that it becomes easy to lose perspective on how much you've changed the footage. That's why you have to constantly A/B test your denoised clip against the original. Nearly every editor has a simple toggle or split-screen for this. Use it. A lot.
Flip the effect on and off. Are you losing the fine lines around the eyes? Is the skin looking a bit too smooth? Honestly, a little bit of leftover luminance grain often looks more natural and cinematic than a perfectly sterile image. This is as much an artistic choice as it is a technical one.
Here’s a pro tip: look for the NR Blend control. If you feel like you've pushed it just a hair too far, you can use this to mix the original texture back in. Instead of 0% (full effect), try dialing it back to 10% or 20%. This can reintroduce just enough of the original character to make the result feel clean but still organic.
Finally, remember there's no magic formula. The settings that work for a static landscape will be completely wrong for a fast-paced action shot. The real skill is building an intuition for how these tools work together, which is the key to consistently delivering polished, professional footage.
Better Background Removal Starts with Clean Footage
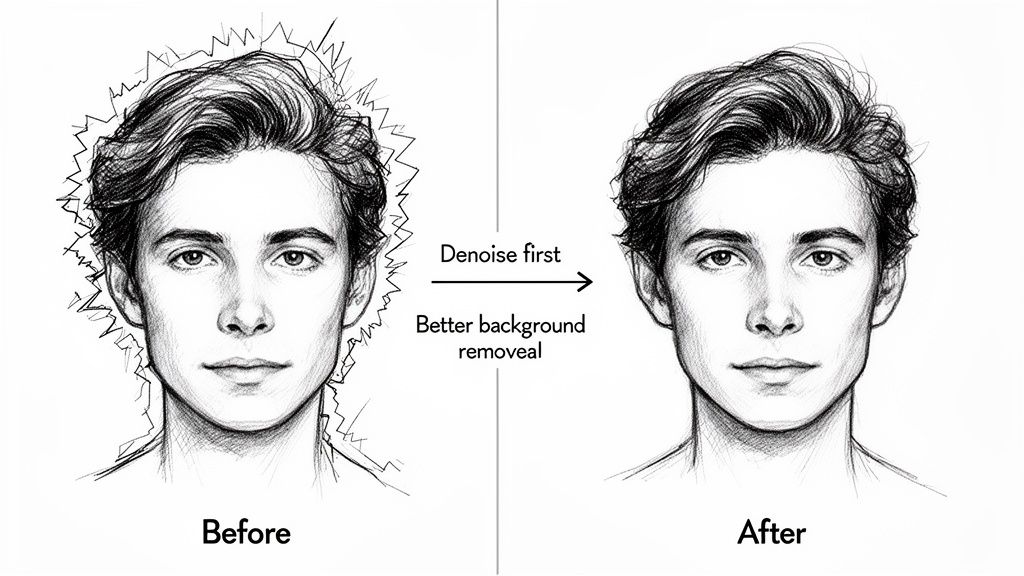
Most people treat background removal as a one-and-done step, but I'll let you in on an industry secret that makes a world of difference: clean your footage first.
Running a quick video noise reduction pass before you even think about cutting out your subject is a total game-changer. It’s a simple preparatory step that solves one of the biggest headaches for AI-powered tools.
Why Noisy Footage Confuses AI Models
So, what's actually happening here? Think of it from the AI's point of view. Its entire job is to find the exact line between your subject and the background. But when your video is swimming in grainy, shimmering digital noise, the AI has to guess which pixels are part of the subject and which are just random static. This confusion is why so many automated cutouts end up looking messy and unprofessional.
Digital noise throws thousands of flickering, random pixels into every single frame. To an AI model, that erratic data can look like movement or texture that isn't really there. The algorithm just can't define a stable, consistent edge when the edge itself is constantly shifting because of all that visual static.
This is the root cause of those classic background removal problems:
- Flickering Edges: The cutout shimmers and jitters because the AI can’t lock onto a clean line from one frame to the next.
- Chunky Hair Detail: Fine details, like individual strands of hair, get completely lost in the noise, leaving you with that dreaded "helmet hair" look.
- "Crawling" Artifacts: You see those weird, noisy patches of the old background that seem to cling to your subject, especially when they move? That's the AI getting confused.
When you feed an AI a noisy clip, you're essentially asking it to make a tough call with bad information. The result is almost always going to be a compromise.
By running a denoiser first, you give the AI a clean, clear signal. The edges become sharp, the colors are solid, and the algorithm can do its job with much greater accuracy and confidence.
A Practical Example of the Denoise-First Workflow
Let's say you just shot a product review in a room that wasn't perfectly lit. The footage is fine, but you can see that tell-tale grain swimming around in the shadows.
If you throw that clip directly into an AI background remover, the tool will struggle to tell the difference between the noisy shadows on your shirt and the noisy shadows on the wall. The result? A wobbly, unconvincing cutout that screams "amateur."
Now, let's try it the right way. Before uploading, you run that clip through a gentle noise reduction filter in your editor. This one step smooths out that random grain, creating a much cleaner separation between you and the background.
When you upload this cleaned-up version, the AI sees a crisp, defined edge. It can trace your silhouette perfectly, preserving fine details without getting tripped up by visual static. The final output is sharp, stable, and looks infinitely more professional. You can dive deeper into how this process works by checking out our AI video background removal guide.
Clean Source Material is Everything
This "clean input, clean output" philosophy is only getting more important. The entire industry behind this technology is massive—the noise suppression components market, which supports both video and audio processing, was valued at USD 28.33 billion in 2025 and is on track to hit USD 86.33 billion by 2034. You can see the full breakdown from Precedence Research. That kind of money shows just how critical clear source data is.
For creators, this means prepping your footage isn't just a best practice—it's a real competitive advantage. Taking an extra ten minutes to apply video noise reduction can save you hours of cleanup and frustration, bumping your final product from mediocre to studio-quality.
Common Questions About Video Noise Reduction
Even with the best tools, you’re bound to hit a few snags during an edit. Here are some of the most common questions I get, along with clear answers to help you solve problems on the fly and really sharpen your noise reduction skills.
Think of this as having an expert on standby. We’ll get into everything from saving incredibly noisy footage to striking that perfect balance between a clean image and one that still looks sharp and natural.
Can You Fix Extremely Noisy Low-Light Footage?
Yes, you often can, but it’s crucial to manage your expectations. When a video is shot in near darkness with the ISO cranked way up, you're not just removing noise—you're trying to reconstruct information that was barely captured to begin with. Going too heavy on the noise reduction here is a one-way ticket to a blurry, plastic-looking mess.
My go-to strategy for this is a two-step combo:
- First, I lean on Temporal Reduction. This is the heavy lifter. Use it to clean up the static parts of the shot, like walls and backgrounds, which is usually where the noise is most obvious.
- Then, I apply Spatial Reduction lightly. The key word is lightly. This just helps soften the remaining grain on your subject without completely wiping out all the texture and detail.
The goal isn't to make the footage look like it was shot in broad daylight. You're simply trying to make the noise less distracting so the viewer can actually watch the video. A clean but slightly soft image is almost always better than a noisy but technically "sharp" one.
Does Noise Reduction Affect Video Sharpness?
Absolutely. This is the central trade-off you’re always making with video noise reduction. At their core, most noise reduction algorithms work by analyzing and blending pixels—it’s essentially a very sophisticated blurring process. If you push the effect too hard, you will inevitably soften important details along with the unwanted grain.
The real art of noise reduction is finding that sweet spot where you've removed the most distracting noise while keeping the most critical detail. Honestly, a little bit of leftover luminance grain often looks more natural and cinematic than a perfectly sterile, over-processed image.
Always, always use your editor's split-screen or bypass toggle to A/B test your changes. Ask yourself: have I lost the texture in the actor's shirt? Are their eyes still sharp? If the details are gone, you’ve gone too far. Dial it back.
Should I Apply Noise Reduction Before Or After Color Grading?
Always apply noise reduction before color grading. This is a golden rule in post-production that will save you from a world of hurt.
Color grading, especially when you start cranking up the contrast or saturation, will make any noise in your footage a hundred times worse. If you grade first, you're just creating a much bigger, uglier problem for yourself. By cleaning the footage at the start, you give your color tools a smooth, stable canvas to work with. This means cleaner grades, more accurate colors, and way fewer weird artifacts.
This "clean the source first" mindset is just as important for audio. In fact, if you're also dealing with unwanted sounds, you can find a complete guide on how to remove background noise from video that follows a very similar philosophy.
What Is The Difference Between Luma and Chroma Noise Reduction?
Getting this distinction is what separates amateur work from professional results. Most advanced tools give you separate controls for each.
- Luma Noise (Luminance): This is the grain you see in the brightness of the image, appearing as black-and-white or grayscale speckles. It's often less distracting and can sometimes even be mistaken for classic film grain, which can be a nice stylistic touch.
- Chroma Noise (Chrominance): This is the ugly stuff. It messes with the color information, showing up as random red, green, and blue splotches. Chroma noise almost always looks cheap and digital, so you want to be much more aggressive with it.
A classic pro move is to hit the chroma noise hard to get rid of those distracting color blotches, while using a much lighter touch on the luma noise. This cleans up the image significantly without mushing all the fine details, preserving a more natural, pleasing texture.
Achieving a clean, professional look starts with the best possible source footage. If your work involves removing or replacing backgrounds, starting with a denoised clip is absolutely essential for getting sharp, accurate cutouts. VideoBGRemover makes this whole process painless, using AI to deliver studio-quality results without needing a green screen. Try it for free today!
Ready to Remove Your Video Background?
See a free preview before you buy.
No credit card required • Free preview on every video