How to Make a Transparent Background: how to make transparent background
Learn how to make transparent background for images and video with quick steps, tools, and workflows for Photoshop, AI, and export formats.
Making a background transparent is one of those fundamental skills every creator needs in their back pocket. The quickest route is often a one-click AI tool, but the real key is knowing how to save your work. For images, that means saving your final file as a PNG. For video, you’ll need special formats like WebM or ProRes 4444 to keep that transparency intact.
The whole idea is to isolate your subject and get rid of everything else. It’s the secret to creating clean graphics, dynamic video overlays, and professional-looking content.
Why Transparent Backgrounds Matter
Learning how to remove a background isn't just a technical exercise—it's about creative freedom. Think about it: whether you're designing an ad, creating a YouTube thumbnail, or prepping product photos for an e-commerce site, a clean cutout is a must-have. It lets you drop your subject into any new scene without that ugly, distracting box around it.
This is exactly how professional social media graphics, slick video overlays, and polished website designs are made. Instead of being stuck with the original background, you get the flexibility to create layered, attention-grabbing visuals.
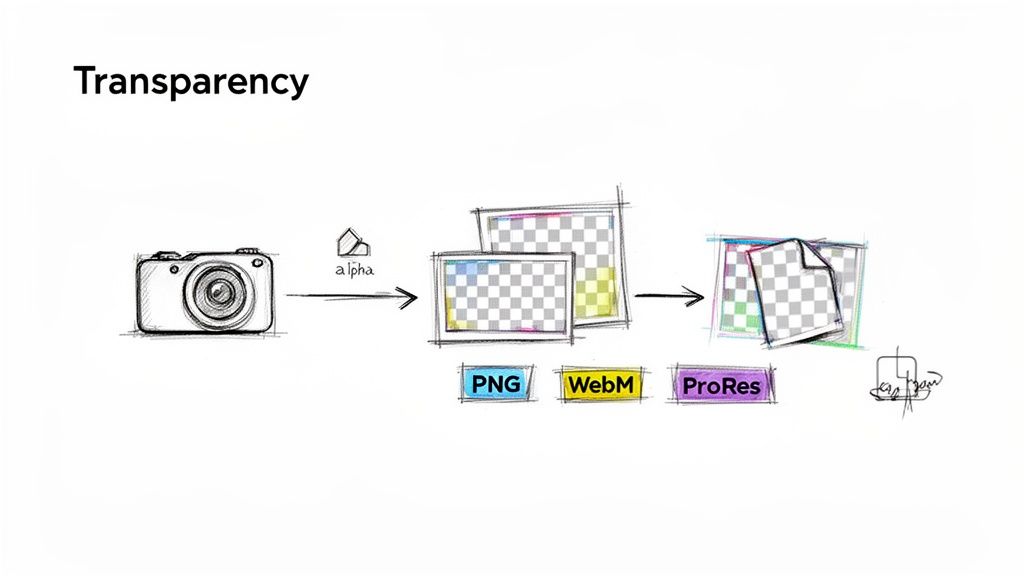
The Magic Behind Transparency
So, how does it actually work? The secret is something called an alpha channel.
Imagine your standard image has three channels of color information: Red, Green, and Blue (RGB). An alpha channel is essentially an invisible fourth channel that rides along with them. This channel tells every single pixel how transparent it should be, on a scale from 100% opaque to completely invisible.
The catch is, not all file formats can handle this extra data. This is why you can’t save a JPEG with a transparent background—the file type just doesn't have a slot for the alpha information. Knowing which format to use is half the battle.
- For Images: PNG is the go-to. It was built from the ground up to support a high-quality alpha channel, making it perfect for web graphics, logos, and photos.
- For Videos: You'll need formats that can handle both motion and transparency. Apple ProRes 4444 and WebM (with a VP9 codec) are two of the most common, and they are essential for motion graphics and complex video editing.
Mastering transparency means you're no longer limited by your original recording environment. It gives you the power to create polished, high-quality content that looks like it was produced in a professional studio, even if it was shot in your living room.
Making Your Image Backgrounds Disappear
Nailing a clean, transparent background on a static image is one of those fundamental skills every content creator needs. It’s what separates a professional-looking product shot from an amateur one and gives your YouTube thumbnails that polished, clickable pop. You can get it done in a few seconds or spend time finessing every last detail—it all depends on what you need.
And the need is huge. The market for background removal tools was valued at US$1.78 billion back in 2025 and is expected to blow past US$5.65 billion by 2033. This isn't just a niche skill; it's a requirement for major players like Amazon, which hosts a staggering 2.5 billion product listings, many of which require that clean, transparent look.
The Fast and Easy Way: Online Tools and Your Phone
When you just need something done now, nothing beats a one-click online tool. Sites like remove.bg or Adobe Express are built for speed. You just drag and drop your image, and their AI handles the rest, spitting out a transparent version in seconds. It's the perfect solution for quick social media graphics where perfection isn't the goal.
Your phone can probably do it, too. If you're on an iPhone, just tap and hold on a person or object in a photo. iOS will intelligently lift the subject right out of its background, letting you drag it into another app as a ready-to-use transparent layer.
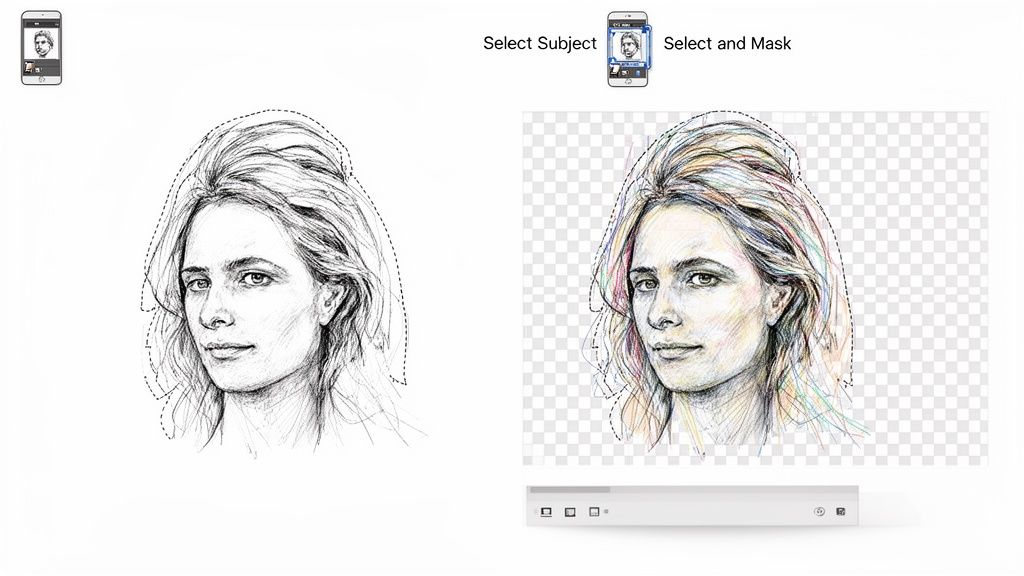
The Pro Method: A Deep Dive into Adobe Photoshop
For those times when every pixel counts, you’ll want the control that only a powerhouse like Adobe Photoshop can offer. It takes a few more steps, but the payoff is a flawless cutout, even with tricky subjects like wispy hair or fuzzy fabric.
First, open your image and let Photoshop's AI do the initial heavy lifting with the Select Subject tool. It’s surprisingly good at finding the main subject and will give you a solid selection to start with.
From there, head straight to the Select and Mask button. This is where you’ll fine-tune everything.
The Select and Mask workspace is where the real magic happens. It gives you a whole set of specialized brushes and sliders to clean up messy edges, recover fine details, and get that perfect transition from your subject to the background.
Inside this workspace, your most important tool is the Refine Edge Brush. Gently paint over fuzzy or complex edges—like hair or fur—and watch as Photoshop intelligently separates the strands from the background. You can then play with the feathering and contrast sliders to soften or harden the mask's edge for a more natural look.
When you're happy with how it looks, make sure you output to a New Layer with Layer Mask. This is a non-destructive way of working, which means your original photo stays untouched underneath the mask, just in case you need to go back and make changes later.
Don't Forget to Save It Right
All that hard work will be for nothing if you don't export the image correctly. To keep your background transparent, you have to use a file format that supports it.
- Go to File > Export > Quick Export as PNG. This is the fastest way.
- For more control, choose File > Export > Export As...
- In the export dialog, make sure the format is PNG and the Transparency box is checked.
Whatever you do, don't save it as a JPEG. JPEGs don't support transparency and will automatically fill in the background with solid white, completely undoing your work. Only formats with an alpha channel, like PNG, will preserve it.
Now that you have a perfect cutout, you'll want to make sure it's sized correctly for your platform of choice; here's a handy guide to Instagram image and video sizes. And if you're venturing into animated content, check out our tutorial on how to make a GIF transparent.
Making a Transparent Video Background with AI
Forget wrestling with a green screen or spending hours manually rotoscoping video clips frame by frame. Removing a video background has been completely transformed by AI. What used to demand a ton of skill and expensive software can now be knocked out in just a few minutes, right from your web browser.
This isn't just a minor tweak; it's a monumental shift in video production. The market for these AI video tools is projected to explode from USD 3.67 billion in 2026 to an astounding USD 24.89 billion by 2036. That growth is being driven by everyday creators who need polished content for platforms like TikTok and Instagram Reels.
Your New Workflow: Straight from the Browser
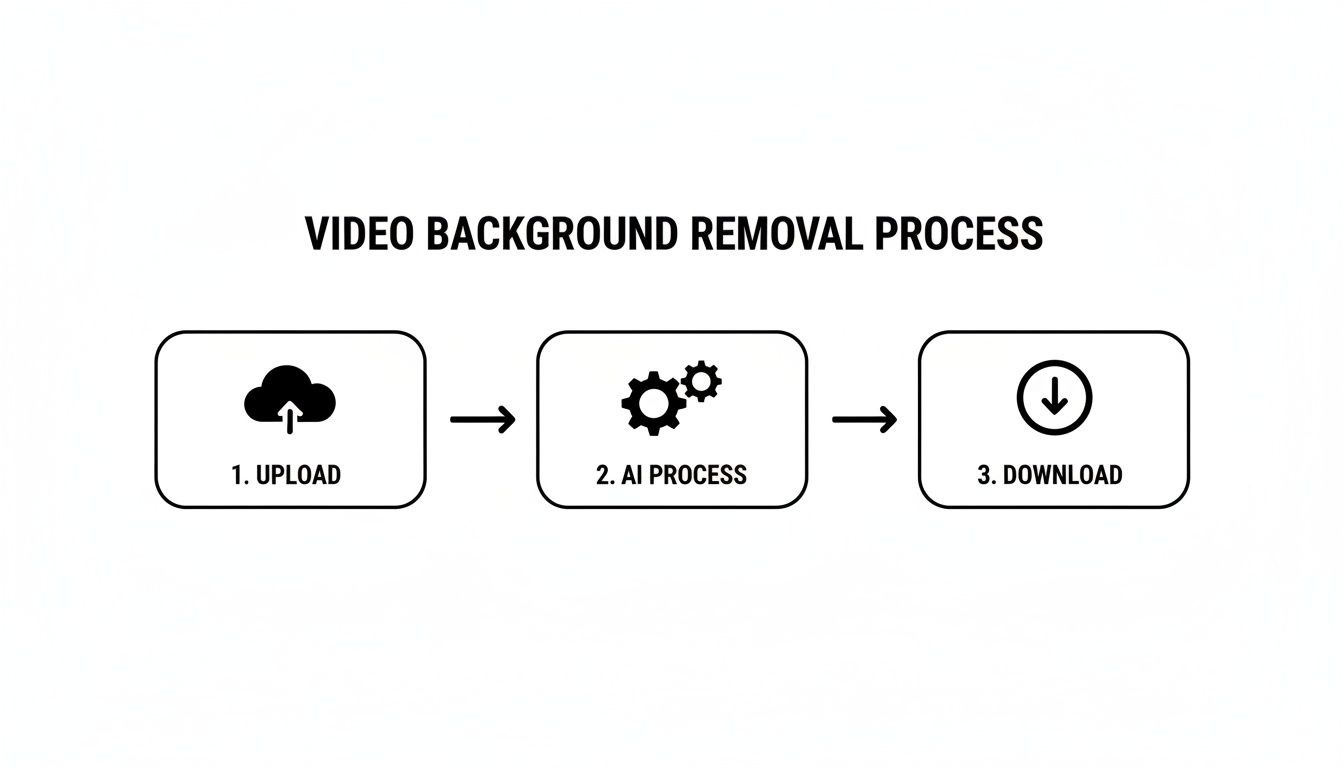
The best part about these modern AI tools is just how simple they are. The old, clunky, multi-step process has been replaced by a workflow that anyone can pick up immediately.
It all happens in a few clicks. You upload your video, the AI gets to work analyzing every frame to separate your subject from the background, and you see a preview almost instantly. There’s no software to install and no subscription required just to try it out.
The real game-changer here is accessibility. You can now get that studio-quality look with a transparent background without needing a physical studio or a powerful editing computer. It levels the playing field, putting professional techniques in everyone's hands.
How AI Nails the Tricky Details
A fair question is whether an automated tool can really handle the fine details. Can an algorithm truly match a human editor when it comes to wispy hair, motion blur, or complex lighting? Increasingly, the answer is a confident "yes."
Today's AI models have been trained on massive datasets, which has taught them how to recognize and preserve even the most delicate elements.
- Fine Hair and Fur: The AI is smart enough to see individual strands against a cluttered background, giving you a clean, natural-looking cutout.
- Motion Blur: It intelligently processes the softened edges that come with movement, so you don't get those harsh, artificial lines common with older tools.
- Shadows and Lighting: The tech can even maintain natural ground shadows, which is crucial for making your subject look like they actually belong in a new scene.
Getting these details right is what makes or breaks the effect, especially since so many viral videos rely on transparent overlays for creative edits. Tools that can promise 98% accuracy without needing a green screen are really setting a new benchmark.
Where This Comes in Handy: Real-World Examples
So, what can you actually do with this? Let’s say you’re a Twitch streamer who wants a clean facecam overlay for your gameplay. Just record yourself against any background, pop the clip into an AI tool, and export a transparent video you can drop right into OBS or Streamlabs.
Or maybe you run an e-commerce store. You can film a quick product demo in your messy office, strip out the background, and place your subject against a clean, branded graphic. Just like that, your video looks like it was shot in a professional studio, which helps build trust with customers. This is a go-to workflow for people using an AI video background remover to make their content look more professional.
For those looking to integrate this into a larger editing process, advanced online editors like Veed.io also offer these kinds of intuitive tools. From polished corporate training videos to thumb-stopping social media ads, the creative doors are wide open—all without the traditional cost and hassle.
Exporting Transparent Video Like a Pro
You’ve done the hard part—the AI worked its magic, and your subject is perfectly isolated. But now comes the most common stumbling block for creators: how do you actually save the video so it stays transparent? If you just hit "export" and choose a standard MP4, you'll be met with a frustrating black or white background, undoing all your hard work.
The problem is that most common video formats, like the MP4 files we all know (using an H.264 codec), simply aren't built to support transparency. They lack what's called an alpha channel, which is the extra layer of data that tells editing software which parts of the frame should be see-through. To keep that transparent background, you need to use specific formats designed for this exact purpose.
Choosing the Right Transparent Format
When your AI tool gives you the export options, you'll see a few key choices that are built to handle transparency. Each one has its own strengths, so picking the right one really depends on what you plan to do with the video next. Think of it as choosing the right tool for the job.
- MOV ProRes 4444: This is the heavyweight champion. It delivers nearly flawless quality and a pristine alpha channel, which is why it's the industry standard for professional video editing and motion graphics. If you're bringing your clip into a program like Adobe Premiere Pro or DaVinci Resolve for more work, this is your best bet. The file sizes are huge, but the quality is absolutely unmatched.
- WebM (VP9 Alpha): This is the modern, web-friendly option. It gives you excellent quality with a much smaller file size compared to ProRes, making it perfect for website backgrounds, streaming overlays, and digital ads where every kilobyte matters for loading speed. Most modern browsers support it, so it's a super-efficient choice for anything online.
Don't panic if your exported transparent video shows a black background when you play it in a standard media player like VLC or QuickTime. The transparency data is still there; these players just don't know how to render it. Your editing software will see it correctly.
The process has become incredibly simple. You upload your footage, let the AI do its thing, and then download a ready-to-use transparent asset.
What used to be a highly technical task that required serious rotoscoping skills is now just a few clicks away, putting professional results in everyone's hands.
Transparent Video Format Comparison
To help you decide at a glance, here’s a quick breakdown of the most common formats that support an alpha channel.
| Format | Quality | File Size | Best Use Case |
|---|---|---|---|
| MOV ProRes 4444 | Near-Lossless | Very Large | Professional video editing, high-end compositing, and broadcast. |
| WebM (VP9) | Excellent | Small | Websites, online ads, and streaming overlays where speed is key. |
| QuickTime Animation | Lossless | Large | Older motion graphics workflows; less common now but still supported. |
| AVI (Uncompressed) | Lossless | Enormous | Archival purposes or specific legacy software; generally impractical. |
Ultimately, for most modern creative work, your choice will almost always be between the uncompromising quality of ProRes 4444 for editing and the web-optimized efficiency of WebM for online delivery.
A Professional-Grade Workflow
The demand for high-quality, transparent video is exploding, with the Video Editing Market projected to hit USD 4.99 billion by 2031. Just a few years ago, reliable alpha channel support was a rare feature. Today, modern tools can directly export professional formats like MOV ProRes 4444 and WebM—a game-changer for the professional users who make up 59.10% of the market. You can dig deeper into these trends by checking out the video editing market evolution on mordorintelligence.com.
Once you've exported your file, using it is a breeze. In Premiere Pro, for instance, you just drag the MOV or WebM file onto your timeline. It will instantly appear with a transparent background, ready to be layered over other clips or graphics. There are no extra steps required—the software automatically recognizes and interprets the alpha channel.
If you want a more detailed walkthrough, be sure to check out our guide on working with transparent MOV ProRes videos.
Common Issues and How to Fix Them
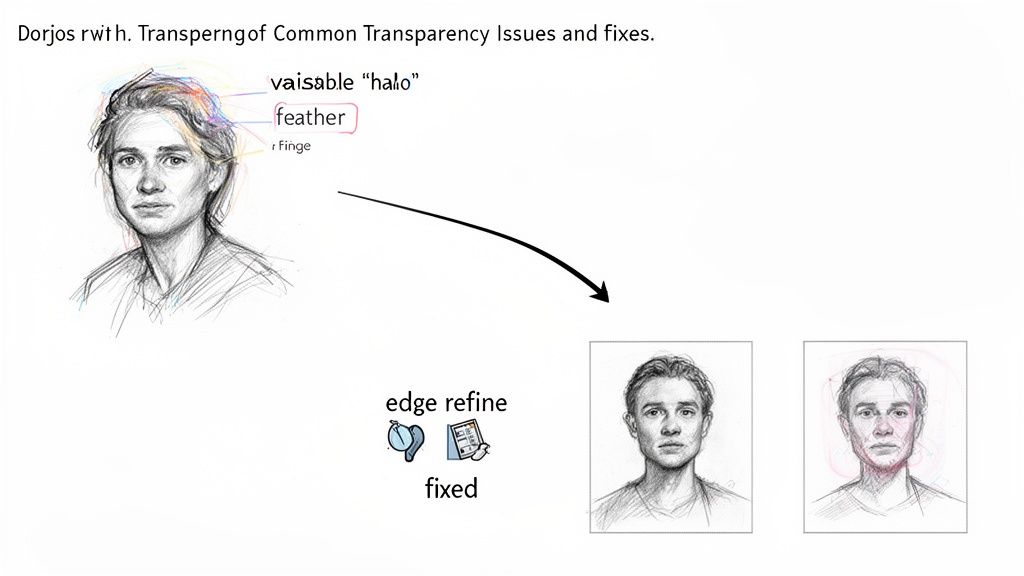
Knowing how to make a background transparent is a game-changer, but let's be honest—it doesn't always go smoothly on the first attempt. You're bound to run into a few frustrating but totally fixable problems. Let’s walk through the usual suspects so you can get your project back on track.
One of the most common headaches is the dreaded "halo" or "fringe" effect. It’s that thin, ugly outline of the old background that just won't let go of your subject's edges. This is a classic issue when the subject and the background are too similar in color or tone, which can easily confuse even the smartest AI.
While most one-click tools are fantastic time-savers, they can get tripped up in these low-contrast situations. If you're seeing a stubborn halo, the best fix often starts before you even hit the record button.
Refining Your Cutouts and Avoiding Halos
The absolute best way to get a clean edge is to create good separation between your subject and the background while you're filming. A well-lit subject against a plain, contrasting wall gives any removal tool a much easier job. Think bright subject, dark background—or the other way around.
Of course, re-shooting isn't always an option. If you're stuck with the footage you have, you'll need to get in there and refine the mask. Here are a few things I do all the time:
- Contract the Mask: Look for a "shrink" or "contract" setting in your tool. Pulling the mask's edge inward by just a few pixels can be enough to slice off that pesky fringe.
- Feather the Edge: A very subtle feather, maybe just 1-2 pixels, can soften a harsh, jagged edge. This helps the subject blend more naturally into whatever new background you place it on.
- Manual Touch-Ups: When you need absolute precision, it's time to go manual. Bring your transparent PNG sequence or video into an editor like Adobe Photoshop or After Effects to paint directly on the mask and clean up those stubborn spots.
Why Your Transparent Video Looks Black
This one causes a lot of panic, especially for editors new to alpha channels. You export a perfect MOV ProRes 4444 or WebM file, double-click it on your desktop, and your subject is just floating in a sea of black.
Don't panic! Your file isn't broken. The transparency information is still there.
The problem is that most standard media players—like QuickTime or VLC—don't know how to interpret and display an alpha channel. They just show those transparent areas as solid black. Your professional editing software, on the other hand, knows exactly what to do with it.
When you import that very same file into Adobe Premiere Pro, DaVinci Resolve, or Final Cut Pro, that black background will vanish, revealing the transparency you wanted all along. It’s just a weird quirk of the workflow, not an export error. Trust the process, drop the file into your timeline, and you'll see it works perfectly once it's layered over another video clip.
Got Questions? We've Got Answers
Once you start working with transparent backgrounds, a few common questions always seem to pop up. Think of this as the expert cheat sheet I wish I'd had when I was starting out. Let's clear up some of the most frequent points of confusion.
What's the Best File Format for a Transparent Image?
Hands down, PNG (Portable Network Graphics) is the gold standard for still images with transparency. It's not even a competition.
A JPEG will always bake in a solid background color, usually white or black, filling in all that empty space you carefully removed. But the PNG format was built from the ground up to support an alpha channel. That's just a fancy term for an extra layer of information that tells each pixel how transparent it should be. When you save as a PNG, you're keeping that vital data, which is why it's the go-to for logos, icons, and any graphic you plan to overlay on something else.
Can a GIF Have a Transparent Background?
Technically, yes, but you’ll probably regret it. GIFs do support transparency, but it's incredibly basic.
A pixel in a GIF can only be 100% transparent or 100% opaque. There's no middle ground for soft, semi-transparent edges. This creates a harsh, jagged outline around your subject that often looks unprofessional. For simple, blocky animations it might pass, but if you need a clean, smooth look, a proper transparent video format is always the better move.
The biggest takeaway here is knowing your formats. Using PNG for images and a format like MOV ProRes 4444 or WebM for video is the key to preserving the transparent background you worked hard to create.
Why Is My Transparent Video Showing a Black Background?
This one trips up everyone at some point, so don't feel bad. You export your beautiful video with a proper alpha channel (like a MOV ProRes 4444 or a transparent WebM), you open it in a media player like VLC or QuickTime to check your work, and… it has a solid black background.
Breathe easy—your file isn't broken. The transparency is still there.
The problem is that most everyday media players simply aren't designed to interpret and display a video's alpha channel. They see that "empty" data and default to showing it as black. But the moment you drop that same file into a professional video editor—think Adobe Premiere Pro, DaVinci Resolve, or Final Cut Pro—the software will read the alpha channel correctly, and your background will be perfectly transparent, just like you wanted.
Ready to create stunning videos with flawless transparent backgrounds in just a few clicks? Try VideoBGRemover today and see how easy it is to get studio-quality results without a green screen. Start for free on videobgremover.com.
Tagged with
Ready to Remove Your Video Background?
See a free preview before you buy.
No credit card required • Free preview on every video