How To Change Video Background Without Green Screen With AI
Learn how to change video background without green screen using AI tools for seamless, professional results quickly and easily.
Looking to swap out a video background without fuss or green screen? VideoBGRemover handles real-time AI segmentation and background replacement in under five minutes, giving you clean edges around hair and motion—no complicated setup required.
Here’s a bird’s-eye view of the main ways to change a video’s backdrop without a green screen:
Summary Of Key Steps
| Method | Tool | Setup Required | Time Estimate |
|---|---|---|---|
| Real-Time AI Swap | VideoBGRemover | Browser, Internet | 3–5 minutes |
| Professional Keying | After Effects | Install, Plugins | 15–20 minutes |
| On-The-Go Cutout | Smartphone Apps | App Download | 5–10 minutes |
Pick the option that best matches your workflow and hardware. Each approach balances speed, quality, and ease of use.
Fast AI Background Change Workflow
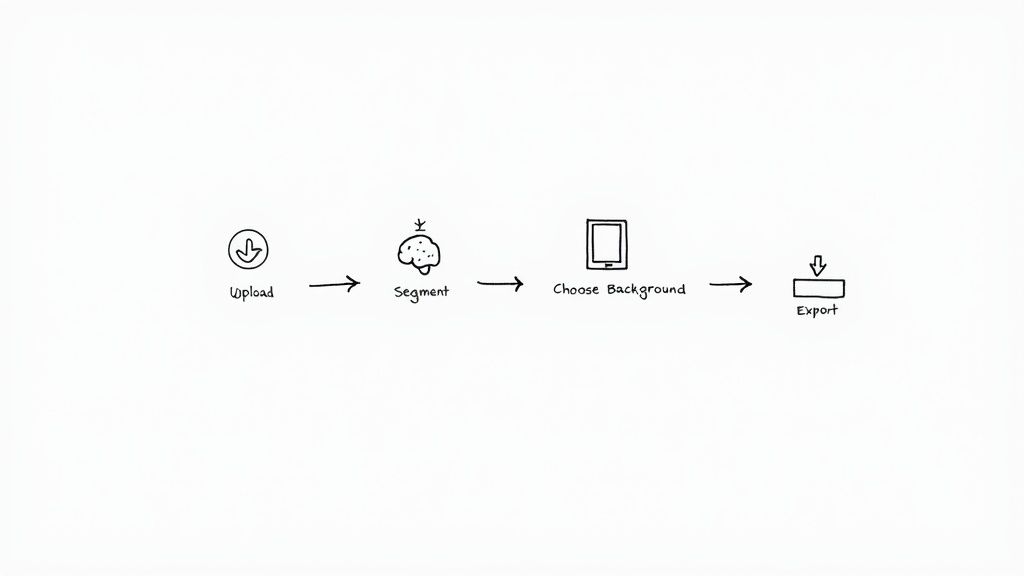
Upload your footage in seconds—MP4, MOV, or WebM all work right in the browser. The AI kicks in immediately, isolating your subject frame by frame.
Recommended Settings
- Choose 1080p or 4K resolution for crisp details and smooth outlines.
- Keep AI sensitivity at medium to balance speed with accuracy.
- Run in Chrome or Firefox for the most consistent performance.
Export Timeline
- Raw upload and live preview: 1–2 minutes
- Background swap and full AI render: 2–3 minutes
- Final download: under 30 seconds
High-contrast backgrounds and even lighting speed up AI segmentation and improve mask quality.
No additional hardware is needed beyond a modern PC or laptop. If you spot any hair strands missing, tweak the sensitivity slider or clear your browser’s cache.
Advanced Color Blending
- Match your new background’s lighting to the subject’s skin tone for a realistic result.
- Apply in-browser color correction presets when you switch to vivid or dark backdrops.
- Preview at 30 fps and 60 fps to catch any jitter along the edges.
Tweak gamma and contrast on custom backgrounds to minimize halos around your talent.
Common Mistakes To Avoid
- Uploading low-res footage, which leads to blocky masks.
- Cranking sensitivity too high, creating unwanted halos.
- Skipping motion tests, which can hide segmentation glitches.
Always preview exports in different media players to ensure transparency holds up everywhere.
For a deeper dive into non–green screen background techniques, check out our guide on video backgrounds without green screen.
With these settings and tips, swapping your video background becomes a quick, reliable process—no green screen needed.
Prepare Your Equipment And Software
Picking the right setup makes a noticeable difference once you start removing backgrounds. On a desktop, aim for 16GB RAM, a quad-core processor and an SSD—this combo handles AI segmentation without hobbling your workflow. If you’re shooting on the go, flagship phones like an iPhone 13 or Galaxy S21 capture crisp footage that AI tools can chew through effortlessly.
A rock-solid internet link is just as important when you lean on cloud processing. A steady 20Mbps connection keeps uploads smooth and prevents those awkward mid-render interruptions.
Recommended Hardware Specs
- Desktop or laptop
- 16GB RAM, quad-core CPU, SSD for quick reads and writes
- Mobile shooting kit
- Record at 1080p and 30fps to ensure clean edges
- External storage
- Portable SSDs or high-capacity SD cards for long takes
Swapping footage between devices is seamless when you plan your storage strategy in advance. Keep USB-C drives or pocket SD cards on hand so you never scramble for space.
Chrome and Firefox remain the fastest browsers for VideoBGRemover’s interface.
“I switched to Chrome after a few crashes in Safari and saw my render times cut by half.”
— Content creator testimonial
Verifying Your Software Environment
Before you hit upload, double-check your files. MP4, MOV and WebM play nicely—while AVI and MKV occasionally throw errors.
A quick glance with MediaInfo lets you confirm codecs and spot mismatches that might stall AI detection. Remember: clean separation between your subject and background—no cluttered rooms or harsh backlighting—yields the most reliable segmentation.
The video background remover sector is on pace to jump from $10 million in 2025 to $723 million by 2033, at a 46.4% CAGR. See the full market report for details.
Checking Browser And Network Readiness
- Update your browser to the latest build
- Activate hardware acceleration in settings
- Test your upload speed via Fast.com
Clearing cache regularly avoids stale assets and unexpected hiccups.
Pro Tip: Bookmark VideoBGRemover so your daily edits start in one click.
Ensuring your videos are prepped cuts down on errors. A quick transcode in HandBrake transforms finicky files into browser-friendly MP4 H.264.
HandBrake Workflow
- Import your source clip
- Choose the MP4 container and H.264 codec
- Set bitrate between 4–8Mbps for web uploads
- Save and test the new file in your browser
If you prefer running things locally, an NVIDIA GPU with CUDA support can speed ML inference by 3× compared to CPU alone.
With this foundation in place, you’ll slide into background swapping and creative compositing without missing a beat. Just keep your ambient lighting consistent across takes to avoid jittery AI masks.
Initial Setup for AI Background Removal
Kick things off by signing up for a free VideoBGRemover account. Adjust your browser settings and clear the cache to avoid upload hiccups during segmentation.
- Choose 1080p or 4K resolution for crisp subject outlines.
- Set the frame rate to 24–60fps for a balance between smooth playback and processing speed.
- Enable Hardware Acceleration in Chrome or Firefox.
These tweaks trim errors and speed up the initial background pass. Finally, slide the AI sensitivity control until hair strands and motion look clean without artifacts.
Optimal Environment and Settings
Work in a space with even, diffused lighting—bright spots and deep shadows tend to confuse the AI. Plain backdrops are your friend; busy patterns or sharp contrasts will cause ghosting.
Clear cookies and cache every few days to keep the browser running smoothly. If an upload stalls, try a different browser or compress the file below 500MB before retrying.
“A stable environment cuts segmentation errors by over 30%,” says a seasoned editor.
Upload and Validate Your Clips
Drag your MP4, MOV, or WebM files into the upload panel. Make sure each clip’s resolution matches the settings you picked to avoid re-rendering.
You’ll see resolution options, AI sensitivity levels, and browser recommendations right there. Confirm that frame rates align with your project timeline and use descriptive file names to track versions during batch processing.
- Preview a quick render to catch any pixelation or jagged edges.
- Tweak the sensitivity and retry until the mask looks clean.
“A reliable setup cuts editing time by up to 20%, letting creators focus on storytelling.”
Lock these initial settings in place to make the background-removal workflow frictionless. Clear the cache weekly, check your internet speed if uploads take longer than 30 seconds, and always log in before starting to prevent session timeouts.
These steps lay the groundwork for a smooth AI-driven background swap. Next you’ll see the core workflow replacing backgrounds live.
Workflow With VideoBGRemover For Seamless Background Change
Batch editing cuts out the drudge of one-by-one uploads. Just drag your clips onto the dashboard and let the AI handle the heavy lifting.
- Time-Saving Presets lock in consistent lighting across every take
- Sensitivity Slider refines hair details and motion blur with precision
- Custom Background Library swaps scenes in a single click
Infographic illustrates the core AI setup flow covering resolution, browser choice, and sensitivity settings.
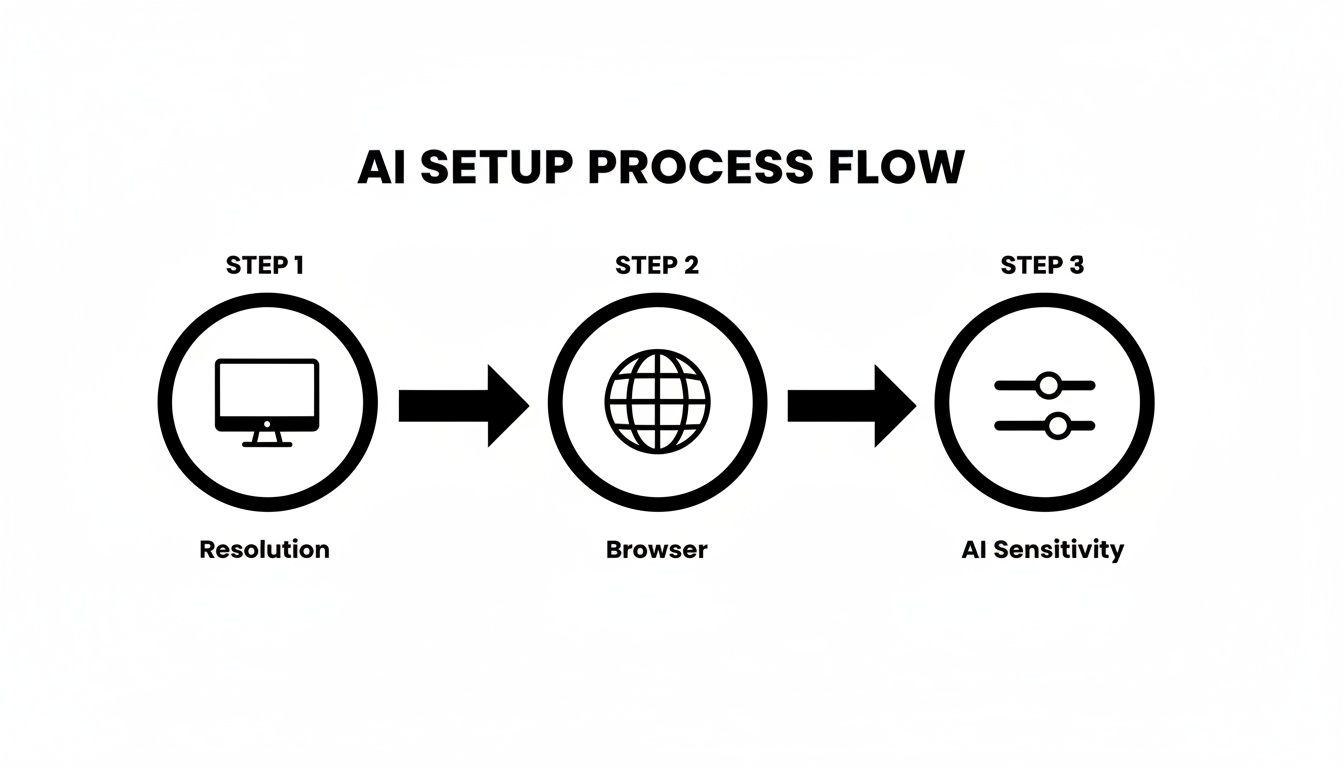
This chart shows why matching resolution and browser first will give you cleaner segmentation before tweaking sensitivity.
Batch Upload And Project Setup
Drag MP4, MOV or WebM files straight into the project area. The tool auto-detects each clip’s resolution so you don’t have to guess.
A quick preview pops up instantly—perfect for catching framing or lighting glitches before they turn into editing headaches.
Inside the editor, you’ll find segmentation controls right beside the playback window. No more hunting through menus.
Real World Examples And Time Saving Tips
A travel vlogger swapped a busy hotel lobby for a tropical shoreline in under five minutes. Meanwhile, an e-commerce creator showcased products on multiple colored backdrops by uploading custom PNGs—boosting engagement overnight.
“Switching backgrounds on ten TikTok clips at once saved me over two hours,” says content creator Alex.
- Keep lighting uniform across all takes
- Name your files clearly to avoid confusion
- Apply batch color grades so every clip feels cohesive
Small tweaks early on let you concentrate on the story instead of wrestling with settings later.
Fine Tune Segmentation And Color Blending
Precision depends on matching your slider values to scene complexity. Push sensitivity up slightly for wispy hair or rapid movement, but beware of halos if you go too far.
| Scene Type | AI Sensitivity | Edge Smoothing |
|---|---|---|
| Indoor Studio | 60% | 5px |
| Outdoor Movement | 70% | 3px |
| Low Light Scenes | 50% | 6px |
For fast hair flicks, nudge sensitivity by 5–10% and preview at 60fps to spot stray pixels. If edges still shimmer, match the background brightness to your subject’s exposure and apply a gentle gamma correction.
Export Options And Final Touches
Once the mask looks good, pick from built-in backdrops or upload your own. VideoBGRemover lets you export:
- Standard MP4 for social sharing
- WebM VP9 Alpha for on-page overlays
- PNG Sequence or MOV ProRes 4444 with transparency for deeper compositing
Export presets can be saved and applied across projects, shaving off precious minutes. Always run a final review in your favorite media player to ensure the transition holds up on different screens.
Check out our guide on how to use a video in VideoBGRemover.
Most simple edits wrap up in under ten minutes, and creators often report cutting their editing time by 50% using these batch workflows and presets.
Common Mistakes And How To Fix Them
Even a seasoned editor can stumble. Spot these issues early to stay on schedule.
- Low-resolution source clips lead to jagged masks
- Overzealous sensitivity creates halos—dial it back by 10%
- Ignoring motion blur triggers pops—toggle on the motion-aware algorithm
A quick slider tweak and a fresh preview usually get you back on track. Master this routine and you’ll spend more time telling stories, not wrestling with software.
Comparing Alternative AI Background Removal Tools
Choosing an AI background removal service blends cost considerations with output quality. Over time I’ve run head-to-side tests on several platforms, noting how speed and precision directly affect my workflow.
Key Factors To Keep In Mind:
- Accuracy can swing editing time dramatically when you’re dealing with fine details like loose hair or complex outlines.
- Pricing Tiers range from free trials and pay-per-use models to enterprise plans—watch out for volume-based fees.
- Platform Support varies from browser-only interfaces to desktop apps and all-in-one editors.
- Standout Capabilities such as live preview and batch export make heavy workloads more manageable.
- Template Collections and custom background libraries help you maintain a consistent brand look.
Looking at industry projections, the video background removal market clocks in at $1.2 billion for 2024 and is expected to reach $3.5 billion by 2033, according to Verified Market Reports. Read the detailed market report by Verified Market Reports for deeper insight.
AI Tool Comparison For Background Removal
Here’s a side-by-side look at popular AI background removal options:
| Tool | Accuracy | Price | Platform | Key Feature |
|---|---|---|---|---|
| VideoBGRemover | 98% | Pay-per-use | Web Browser | Live Preview |
| Unscreen | 95% | Free/Paid | Web Browser | Batch Export |
| VEED | 92% | Subscription | Web/Desktop | Built-in Editor |
| Adobe Express | 90% | Subscription | Web Browser | Brand Templates |
This comparison table highlights each tool’s core strength, making it simpler to match your project requirements with the right feature set.
Real-World Comparison
A small marketing agency ran head-to-head tests on a 2-minute promo clip. Here’s what they discovered:
- VideoBGRemover finished in 4 minutes, preserving intricate hair strands.
- Unscreen took 6 minutes and showed slight edge artifacts.
- VEED wrapped up in 5.5 minutes, although the free plan watermarked the footage.
- Adobe Express exported in 3 minutes, but required a subscription for custom backgrounds.
“My team cut editing time by 50% when switching between these tools based on project type,” says a video editor at a social media agency.
When To Use Each Tool
Quick Social Clips
VideoBGRemover excels at high-speed turnarounds for Instagram Stories and TikTok reels.Freelance Projects
Unscreen’s free tier offers an easy entry point when budgets are tight.Marketing Ads
VEED’s integrated editor simplifies adding text overlays and transitions in one go.Branded Content
Adobe Express shines with its library of prebuilt template packs for a polished look.
Ultimately, your decision will hinge on volume, budget constraints, and feature needs. For most creators learning how to change video background without green screen, VideoBGRemover often comes out on top for its blend of speed, accuracy, and flexible pricing.
For a deep dive into workflows, recommended settings, troubleshooting tips and more, check out our comprehensive guide on AI video background remover.
Troubleshooting And Expert Tips
Even the best AI background removal can stumble when the scene turns hectic or lighting shifts unexpectedly. A few targeted tweaks usually bring things back on track.
When masks look jagged, bump the AI sensitivity by 5–10% and preview at 60 fps. If your exports freeze or crash, switching codecs or routing through a local proxy often clears the bottleneck. These small changes keep your workflow smooth.
Here’s how I’ve solved common headaches:
- Choppy Segmentation: Increase sensitivity by 5–10%, then review at 60 fps.
- Export Failures: Move from H.264 MP4 to WebM VP9 or cut bitrate below 8 Mbps.
- Device Slowdowns: Route through a local proxy or trim clips under 500 MB before processing.
“Adjusting the export format knocked my render errors down by 70%,” recalls a senior editor.
Optimizing Lighting For Segmentation
Good lighting makes life easier for both you and the AI. A pair of softbox lights will eliminate harsh shadows, while a simple fill light at 45° can dramatically improve edge detection.
In one travel vlog shoot, adding that fill light cut segmentation glitches on windy days. The result? Cleaner masks right out of the gate.
| Scenario | Improvement |
|---|---|
| Indoor Interview | 50% Fewer Artifacts |
| Outdoor Vlog | 30% Cleaner Edges |
This quick chart shows how strategic lighting revisions shrink your post-production time.
Combining Software Pipelines
Pairing VideoBGRemover with your favorite color grading suite gives you full creative control. Here’s a streamlined approach I use:
- Upload and isolate your subject in VideoBGRemover.
- Export as MOV ProRes 4444 with an alpha channel.
- Bring it into DaVinci Resolve (or Premiere Pro) for color correction and mask refinements.
Pro Tip: Batch-export low-res proxies so you can test several backgrounds in one go.
When backgrounds get complex, draw custom masks over tricky elements like hair strands. This extra step ensures your finished clip holds up, no matter where you play it next.
Finally, don’t forget to preview on all major devices before you call it done. A quick daily check saves last-minute panic.
FAQ
Ideal Resolution For Sharp Segmentation
When you’re removing a background without a green screen, shoot at 1080p or above. That extra detail helps the AI trace clean edges.
Quick pans and fast subjects can trip up the mask. Bump sensitivity by 5–10% and preview at 60fps to catch any jitter right away.
- Briefly raise AI sensitivity during swift camera moves
- Lock your preview at 60fps for smoother motion
- Keep the background simple to reduce ghosting
Live Stream Tips
Yes, you can stream live without a green screen. Platforms that accept alpha-enabled WebM streams will handle your feed smoothly. Just hook into VideoBGRemover’s API and watch segmentation happen on the fly.
Match your encoder settings for best results. A bitrate of 5 Mbps or higher preserves crisp edges in fast-moving scenes. Shorten your keyframe interval to absorb any network hiccups.
Mobile Editing Options
Mobile browsers now support AI segmentation via WebAssembly, so you’ll get near-desktop quality on both iOS and Android.
For longer edits, switch to the VideoBGRemover app. It speeds up uploads, gives you instant access to background libraries, and syncs work to the cloud—no extra steps when you jump to your desktop.
Supported Formats
VideoBGRemover natively accepts MP4, MOV, and WebM inputs. You can export:
- WebM VP9 with alpha channel
- PNG sequences for frame-by-frame overlays
The service scales up to 4K and handles clips as long as 120 minutes—all without additional plugins or conversion tools.
“Switching to mobile uploads saved me an hour of file transfers,” says a creator.
With these tips, you’ll remove video backgrounds cleanly and confidently—no green screen required.
Ready to simplify your workflow? Give VideoBGRemover a try for flawless background removal at VideoBGRemover.
Tagged with
Ready to Remove Your Video Background?
See a free preview before you buy.
No credit card required • Free preview on every video